Here is a list of a few things your should check before you bring us a file to print:
- Resolution: For a high quality print, use a minimum of 300dpi at print size. You can find this info under the Image Size.
- Color Mode: Set your color mode to CMYK. These are the colors most printers use, so your colors will stay more consistent if you save your file in CMYK instead of RGB.
- Texts: Convert your text to outlines to avoid font issues; especially if you have a unique font.
- Embed your fonts and images. If you are using InDesign, you can package your document to embed everything.
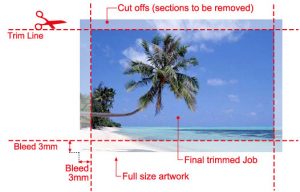
- Bleed: A bleed is when your content goes to the edge of the paper. If so, extend your image at least 1/4” beyond the finished size, so we have something to trim off. We can also shrink it 1/4” to fit a certain page size.

Example of a bleed:
- Margins: Leave at least 1/8” margin for most documents without a bleed. Business cards can have as small as 1/16”. If you plan on making a booklet, leave a larger margin on the side you plan on binding.
- Flatten your images. This will reduce your file size and our processing time.
- File Format: Save or export your file as a PDF.
Tips on printing PowerPoint Slides
- Size: Posters should be created as full-sized PDF’s. If we have to enlarge the image, it could result in poor quality.
- Inserting Images: Use copy and paste to place images in your slide. Do NOT import or link data because the link can be broken and the file won’t print correctly.
- Sizing Images: Images, charts, tables, and graphs should be sized 100% BEFORE being inserted into PowerPoint. Scaling within PP may result in poor quality. Size your image in an application like Photoshop or CorelDraw.
- Text: Use standard, cross-platform fonts.
- Resolution: For a high quality print, use a minimum of 300dpi at print size. You can find this info under the Image Size.
- File Format: Save or export your file as a PDF.
